Fix Your Jeep Grand Wagoneer Tailgate
Fix Your Jeep Grand Wagoneer Tailgate
When I purchased my Jeep Grand Wagoneer the tailgate worked. It was one of the things I was really happy about because I knew what a pain it could be to fix a Jeep tailgate window.
That was then, this is now. (You know where this is going, right?)
As you can guess by the title of this post, the tailgate window stopped going up and down. Ironically, a broken tailgate is one of the most vivid Jeep Grand Wagoneer memories of my childhood!
Frequent readers of the blog may recall my passion for Jeeps starting with my Grandfather’s 1978 Grand Wagoneer. We use to take it on family trips to the mountains. On one particular trip to go skiing, we were driving up the mountain in a massive snow storm. A few miles before we got to the condo at the top of the mountain the tailgate window was fogged up and Dad could not see out of it. In an effort to clear it up, he tried putting the tailgate window down to wipe it off. As the window got halfway down, it stopped working. On a normal day, this wouldn’t be too bad, but the wind was howling, the temperature was in the single digits, and a thick blanket of snow was falling. Needless to say, WE WERE FREEZING!
Don’t let this happen to you when you are driving your Jeep this winter! I will show you how I was able to fix my tailgate window on the ‘ol Wagoneer and it should be a long lasting fix. (Note: from my research, simply fixing the old 1960’s style wiring will likely result in having to fix the tailgate window again in 2-3 years.)
Let’s fix your tailgate window for good. Here’s how…
The first thing to do is go to the International Full-Sized Jeep Association website and visit the homegrown vendors list (link). From there you want to contact Rick (username: Serehill) and purchase one of his custom upgrade kits. Along with the purchase of the kit you get unlimited tech support from Rick. For a guy like me who did not know anything about electrical issues, this was worth every penny.
Get the kit here: Jeep Grand Wagoneer Tailgate Window Upgrade Kit
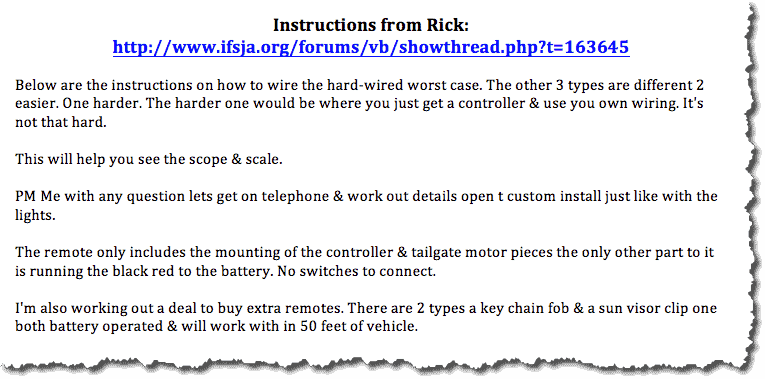
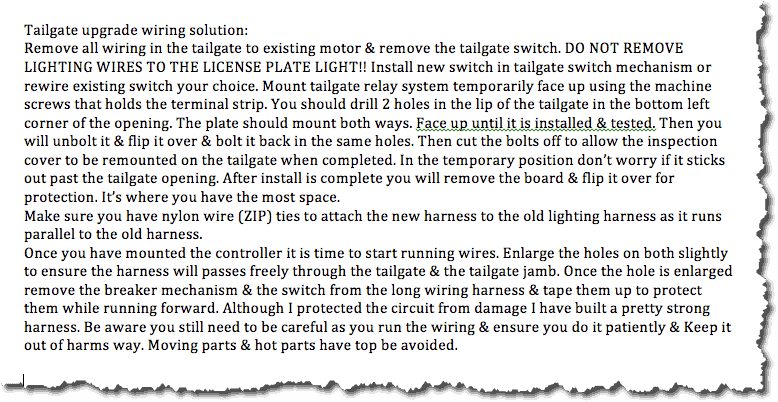
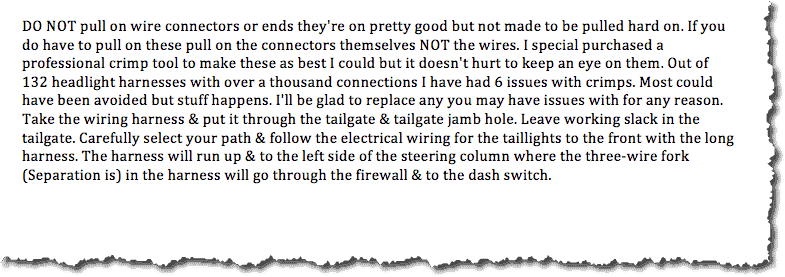
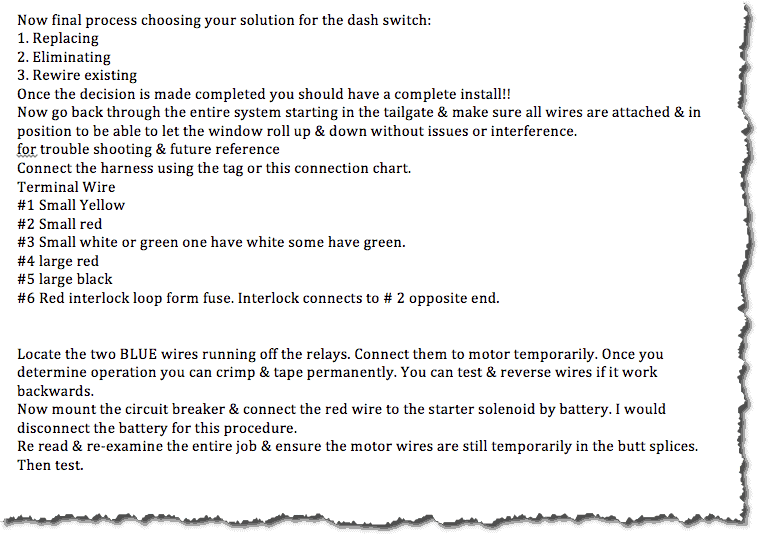
Fortunately, I have successfully installed the kit and this post should help illustrate how to complete the upgrades. Before starting the project yourself, talk to Rick and read his write-up on how to do the job. Here it is for easy reference:
Now that you have gone over Rick’s instructions it should give you a good mental picture of what the new window kit is doing.
Hopefully, this is the area where I can help because I took lots of photos along the way. I am a visual learner, and simply reading the instructions, there were plenty of things I did not know and had to learn along the way.
So let’s take a look at the photos and I will try to give you some tips and tricks to make the job as easy as possible. Here’s what you will need to do…
The first thing you have to do is get access to the tailgate. You need to remove the carpet and open the access hatch. If your window is stuck in the up position, lucky you. If it is stuck down, you have a lot more work. Mine was stuck down.
You have to get your glass up so you can get to the wiring. There are two retaining clips that hold the glass to the lifter arms. Those get removed and then you can CAREFULLY push the glass up.
This is what the original window clips look like:
It is really hard to get to these clips for removal.
You can use force if you need or even destroy them to get them off because you can replace them with size 7/16 e-clips when you put it back together. You can also do what Rick and I did and create two access holes in the tailgate sheet metal. Just make sure you drill your holes where the tailgate carpet will cover up the holes later on.
While you have the drill out (I actually used a drill and jig saw) you will want to widen the wiring access holes in the tailgate and Jeep body where the cables go through. Trust me you really do need to expand these holes. I thought there was enough room, but once you get the wires through you don’t want to redo it (ask me how I know).
I expanded the left side of the access hole about a quarter of an inch and that worked well.
After you expand the holes you are done cutting and drilling for a little while. Let’s move on to taking apart the tailgate. Before you mess with the wires unhook the black cable from the battery so you do not get shocked.
Disconnect the window from the lifter arms and CAREFULLY slide out the glass window. You may want to put something under it to support the glass while it is extended. I did not do this, but I was extremely careful and I never fully extended the glass. I raised it just high enough that I could work without interference and avoid damaging the glass.
Now you will disconnect the wiring plugs. TAKE PICTURES of everything as you go. After the wires are unhooked, you can unscrew the six retaining screws from the lifter arm bracket and remove it from the tailgate.
OPTIONAL IDEA: Here’s an extra tip you may like for your Jeep Tailgate
After you have the lifter arms out, you can drill a hole for a codder pin and washer to use in place of the e-clips. This is a more secure method and as time-consuming as it is to fix the tailgate, you don’t want it to slip out on you.
This method works best if you decided to cut access holes.
Now back to the main task at hand:
Once all of the window guts are pulled out, you can pull the wires through the access holes. I used a fish tape to help push and pull the wires through the Jeep. It made the job so much easier.
If you don’t have a fish tape you may be able to make one out of wire clothes hangers, but just one probably isn’t long enough.
I used frog tape to temporarily connect the wires to the end of the fish tape to get it started through the holes. Once the wires are pulled through the tailgate and body holes, you can start routing the wires along the driver’s side chassis matching where the original tailgate wiring harness goes.
The hardest part is getting above the fuel tank. Without the fish tape it will be REALLY difficult.
After you get the wires pulled along the chassis, over the fuel tank and up to the firewall you will need to zip tie the cable to the existing harness (shown in photo above). But don’t do it yet.
Wait until you know you have your wires laid out to where they need to go. You certainly don’t want to zip tie it, and then realize you didn’t give yourself enough wiring to connect to the dash or battery.
After you get past the fuel tank, you will follow the wiring harness all the way up past the steering column, and this is where the wires will split and go in two different directions.
The green/black/white wires will go through the firewall and to the dash switch.
The black and red wires that are taped together will be pulled across the back of the firewall FAR AWAY from the engine block and anything else that gets hot.
I ran the green/black/white dash switch wires through the firewall hole that the hood latch cable goes through. It was very easy to push it through.
Then I carefully took the black dash trim off and this gave me access to the back of the switch. Using a tiny flathead screwdriver, I was able to push down the clips holding the switch and pull it out.
Once the old switch is out, pull the wires through the opening and plug in the new switch. Don’t push it into the dash opening yet. You want to get everything tested and working first. This way you can reverse the switch if you have the wires reversed for the up/down positions.
Don’t worry, it will easily get pushed into the opening for the old switch when you are ready.
Fishing the wires through the firewall and up to where the new switch will be installed on the Jeep dash.After taking care of the dash, go back to the tailgate. This is when you should drill the mounting holes into the lip of the tailgate access door.
You want to make your holes as low down towards the bottom of the tailgate as possible.
Just make sure you will be able to still get the screw installed on the bolt.
I think these photos are the easiest want to explain it:
In this picture (below), I put the holes in line with the holes for the tailgate cover. This is not right. It did not leave enough room for the glass to close. As a result, I had to drill two new holes almost in the groove where it turns up.
Remember how I said to take lots of photos? Well, I missed a few.
I went through all of my photos and I don’t have a picture of the new holes I had to drill to get the electrical components in the right place.
Moving right along…
Now that you have everything laid out, let’s discuss the tailgate switch. This will require using epoxy to fix. It’s quite easy, but it requires time. This is why you want to do it now.
I completed my project over a weekend so I did the epoxy work and quit for the night so it could cure. Maybe your schedule will be similar to mine.
To fix the rear switch, you will need to epoxy the new switch provided in the kit to the metal tailgate switch braket.
Let’s look at a few photos:
This is the switch before you remove it.
Take this apart and you will epoxy the adapter included in the kit to the switch bracket. Here is what that looks like:
This is where I should tell you what I did wrong.
As you can see, I went heavy on the epoxy. In general, there is nothing wrong with going heavy. However, you want to keep the corners as flush as possible. See how I let the epoxy clump (see below), that required me to use a metal file and file it down so the switch would install flush. If the metal file doesn’t work with the epoxy cold, you can use a heat gun to heat it up and scrape it down. Heat will break down the epoxy.
Fortunately, I got it filed down and screwed the switch into place on the bracket.
Here is what that looks like once the Jeep Wagoneer tailgate switch is reinstalled:
It’s time to put the tailgate back together. I am going to skip over this phase as you are basically reversing the procedure you used before to take it all apart. Also, follow Rick’s instructions for hooking up the wires to the lifter arm motor. He created the kit and I will defer to him on this part.
For what it’s worth, I chose to bypass the safety switch on the tailgate.
This way I can open the tailgate and raise the glass to be able to easily clean the inside of the Grand Wagoneer tailgate window. As you probably know, it takes a lot of effort to clean the inside of the tailgate glass with the safety switch installed.
Let’s review where you should be at this point:
- Pulled all of the wires to their final destination making sure they all fit properly
- Installed the dash switch (but have not snapped it into place)
- Put the lifter arm back in along with hooking up the wires (per Serehill’s instructions)
- Installed the rear tailgate switch
- Hooked the glass back to the lifter arm
It’s time to hook up the Jeep tailgate kit to the battery so you can test out your handy work.
Knowing that black is (-) and red is (+) we can go about getting access to power from the battery. The black wire needs to be grounded to metal. You can use the frame or fender. I decided to ground the black (-) wire under one of the screws holding the starter solenoid.
Conveniently, the start solenoid is also where you will install the red (+) to the (+) post.
Here’s a photo. See the black (-) ground wire going under the bracket at the bottom and the red (+) positive wired getting connected to the positive post.
You will need to use stainless steel metal screws to fasten the inline circuit breaker to the fender well.
Here’s a photo:
Okay, so now you have power and it’s time to test out your hard work. Before you can test the tailgate window, you need to check and make sure nothing is in the way of the tailgate glass. You would hate to have a screwdriver or other tool break the glass window.
If everything is clear, test it out.
Use your dash switch and tailgate switch to make sure they work. If the switch needs to be reversed for up/down control this is the time to do it. You can either reverse the wire on the control board, reverse the wires on the back of the switch, or flip the switch over, whichever is easiest for you.
Once everything is tested, snap your dash switch into place and start to wrap up the project.
To finish, there are a few more things that need to be done. You need to securely attach the control board to the tailgate. Once it is screwed down tight, cut off the bolts so the tailgate cover can be reinstalled.
Then, you are done. Test everything one more time after the tailgate cover is installed. Once you put the carpet back in place, you really don’t want to do it over again (ask me how I know! — I did it 3 times).


